Creating RESTful API Using Spring Boot for The First Time #WeekendBuild
Learn how to create first RESTful API using Spring Boot and also running unit tests

Hi, I am a cat lover and software engineer from Malang, mostly doing PHP and stuff. Software Engineer Live in Malang, Indonesia Visit my resume and portfolios at didiktrisusanto.dev See you, folks!
Last time I wrote Java was early 2013 for my undergraduate thesis. It was a image processing program. I decided wrote in Java because during college era, Java was like main programming language that been taught. Also recently while job hunting, I saw many jobs mentioned Spring Boot as their main stack, so I wonder why not try this stack for my #WeekendBuild series?
Preparation
I am using Windows machine (Windows 11) here so it could be Windows specific
Simply went to spring.io and check quick start page.
Download and install JDK. I am using JDK 21 LTS
Install Extension Pack for Java in VSCode
Once JDK installed, check Windows Environment Variable. Need to add
JAVA_HOMEpath from installed JDK in user variable. Check in terminal or powershel withjava —version. If showed up then ready to go.Install Extension Pack for Java in VSCode. Then in
settings.jsonadd this config. If not, the package name would display a red mark although it’s fine.
"java.project.sourcePaths": [""]
Generate Spring Project
It’s good to know we don’t have initialize the project from scratch, we can use spring initializr.
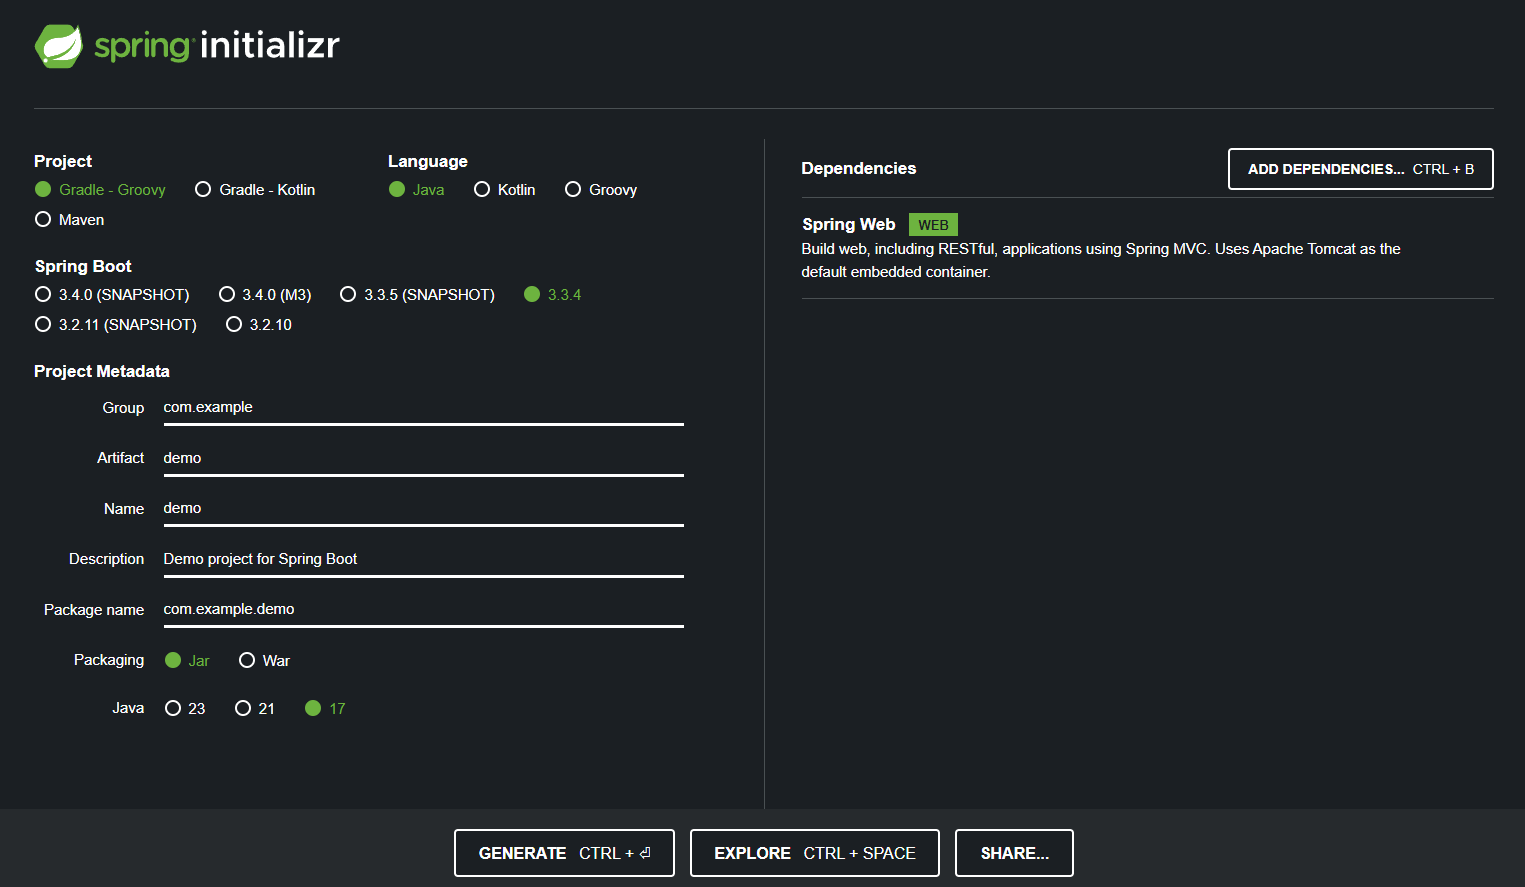
We can define the project attributes here. My setup:
Gradle
Spring Boot default (3.3.4)
Metadata default (demo)
Packaging default (Jar)
Java 17
Spring Webas dependencies because need to build RESTful API
Generate the code and later just extract the downloaded code.
I also noticed when it opened with VSCode and the extension pack already installed, Gradle will automatically download the dependencies in background so later we don’t have to do it manually.
First Web Service API
The goal is I want to create a RESTful API that accept GET /greeting request and returned JSON response.
{
    "id": 1,
    "content": "Hello, World!"
}
To do that, I need to create resource representation class.
Spring uses https://github.com/FasterXML/jackson that automatically marshal the class into JSON
// /src/main/java/com/example/demo/Greeting.java
package com.example.demo;

public record Greeting(long id, String content) { }
Next, create a REST Controller to serve the request.
// /src/main/java/com/example/demo/GreetingController.java
package com.example.demo;

import java.util.concurrent.atomic.AtomicLong;

import org.springframework.web.bind.annotation.RestController;
import org.springframework.web.bind.annotation.RequestParam;
import org.springframework.web.bind.annotation.GetMapping;

@RestController
public class GreetingController {
    private static final String template = "Hello %s!";
    private final AtomicLong counter = new AtomicLong();

    @GetMapping("/greeting")
    public Greeting greeting(@RequestParam(value = "name", defaultValue = "world") String name) {
        return new Greeting(counter.incrementAndGet(), String.format(template, name));
    }
}
@RestControllerannotation to identify that this controller will handle HTTP requests as part of RESTful service.@GetMapping(“/greeting“)annotation it’s like a route, to ensure HTTP request toGET /greetingwill be handled byGreetingfunction.@RequestParam()annotation for binds the value of the query string parameternameinto thenameparameter of thegreeting()method. In this case if the value empty, default valueworldwill be used.Finally it returned resource
Greetingthat we previously defined.
Running The Service
Go to Terminal and run this command to run the service
./gradlew bootRun
Or we can build the project and execute the .jar file
./gradlew build
java -jar build/libs/demo-0.0.1-SNAPSHOT.jar
My first attempt of running bootRun was failed. Later that was my mistake because my generated project was set to JDK 17 but I installed JDK 21 instead. Changing the language version in the toolchain was solved the problem.
java {
    toolchain {
        languageVersion = JavaLanguageVersion.of(21)
    }
}
After the service is running, the API now is accessible at http://localhost:8080/greeting
Tests
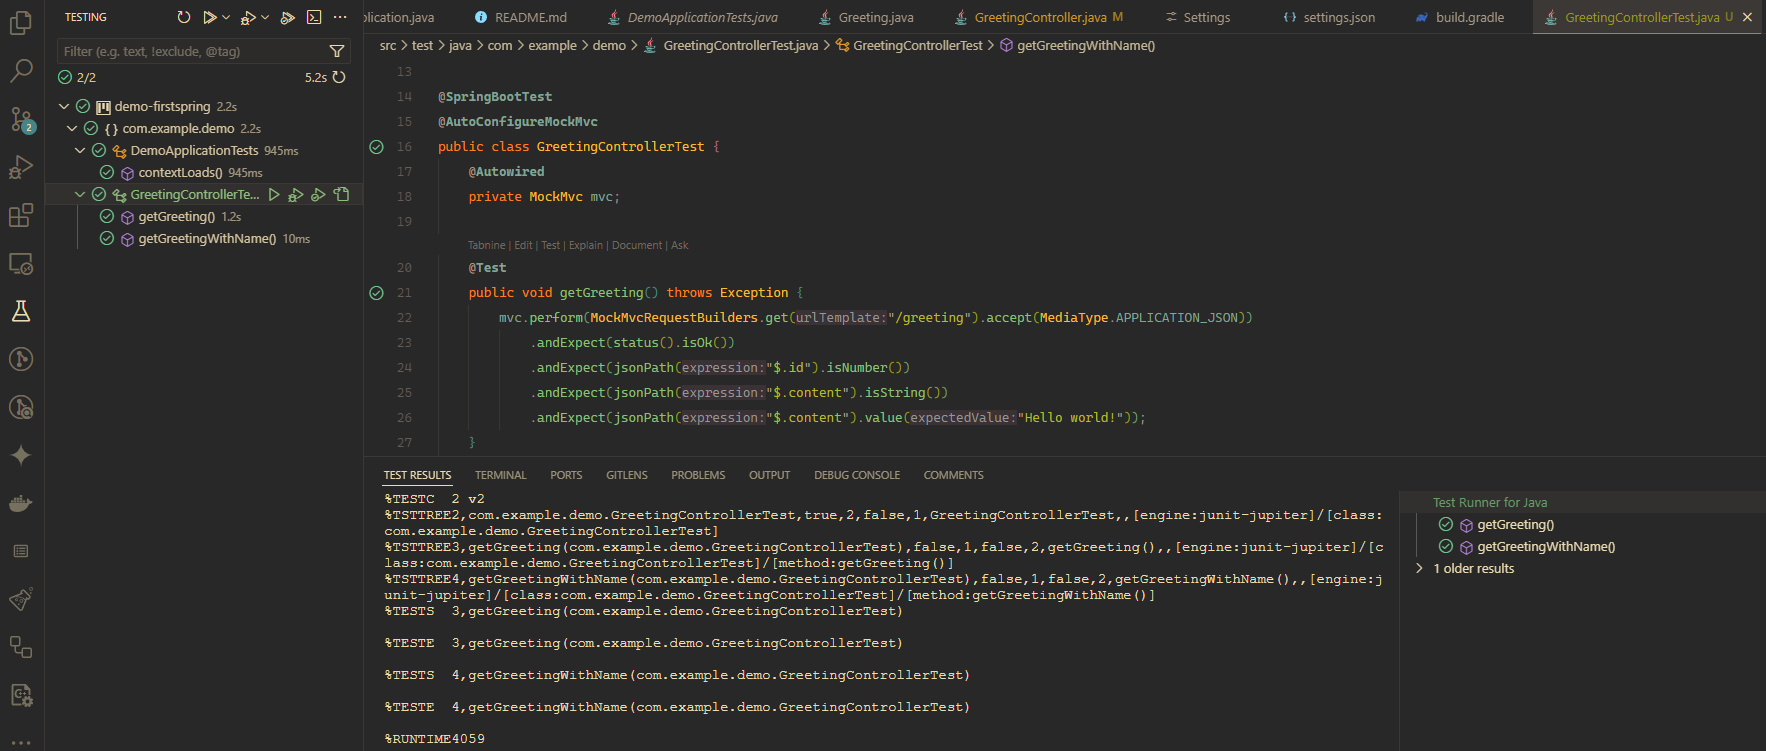
Lets digging more to the tests. It’s possible to test the controller using MockMvc package. In this case I want to test that Greeting controller is giving 200 HTTP Code and proper JSON format.
// src/tests/java/com/example/demo/GreetingControllerTest.java
package com.example.demo;

import static org.springframework.test.web.servlet.result.MockMvcResultMatchers.jsonPath;
import static org.springframework.test.web.servlet.result.MockMvcResultMatchers.status;

import org.junit.jupiter.api.Test;
import org.springframework.boot.test.context.SpringBootTest;
import org.springframework.test.web.servlet.MockMvc;
import org.springframework.test.web.servlet.request.MockMvcRequestBuilders;
import org.springframework.http.MediaType;
import org.springframework.beans.factory.annotation.Autowired;
import org.springframework.boot.test.autoconfigure.web.servlet.AutoConfigureMockMvc;

@SpringBootTest
@AutoConfigureMockMvc
public class GreetingControllerTest {
    @Autowired
    private MockMvc mvc;

    @Test
    public void getGreeting() throws Exception {
        mvc.perform(MockMvcRequestBuilders.get("/greeting").accept(MediaType.APPLICATION_JSON))
            .andExpect(status().isOk())
            .andExpect(jsonPath("$.id").isNumber())
            .andExpect(jsonPath("$.content").isString())
            .andExpect(jsonPath("$.content").value("Hello world!"));
    }

    @Test
    public void getGreetingWithName() throws Exception {
        mvc.perform(MockMvcRequestBuilders.get("/greeting?name=johndoe").accept(MediaType.APPLICATION_JSON))
            .andExpect(status().isOk())
            .andExpect(jsonPath("$.id").isNumber())
            .andExpect(jsonPath("$.content").isString())
            .andExpect(jsonPath("$.content").value("Hello johndoe!"));
    }
}
@SpringBootTestannotation tells Spring Boot to look for a main configuration class (one with@SpringBootApplication, for instance) and use that to start a Spring application context.@AutoConfigureMockMvcannotation to auto injectMockMvcas the test component. It useful to only test the function layer instead of running full server.@Autowiredannotation is like a automatic dependency injection forMockMvcinto the class test@Testannotation to tell Spring that the particular function is a test case. My first attempt I missed this annotation and when I ran the tests, the test case wouldn’t be detected.
So by the code above you will know what the expectation of the test case, right?
Running the tests could be achieved at VSCode by navigate to Testing Icon on the left and click Play icon to run the tests.
Other approach is using command ./gradlew test

Code Repository
I already published the full code on this repository https://github.com/didikz/my-first-spring.
Happy building, Folks!